Puppet/Foreman dirty dirty hacks….

Ok so I am playing with puppet/foreman. I know a lot of people frown on this but I like to sometimes have host name as node.location, this means my FQDN could be node.location.domain.net.au

This was a real pain because after my server was built and would talk to puppet, foreman would create a new node. So I set out to modify the facts that it utilises.

Please not these are dirty dirty modifications and only work with ccTLD type domains (anyone has some improvements please share).


domain.rb


if name = Facter::Util::Resolution.exec(‘hostname’) \

and name =~ /.*?\.\.(.+$)/

#     and name =~ /.*?\.(.+$)/


$1

elsif domain = Facter::Util::Resolution.exec(‘dnsdomainname’) \

and domain =~ /([^.]*\.[^.]*\.[^.]*$)/

#      and domain =~ /.+\..+/

domain = $1

domain


hostname.rb

Facter.add(:hostname, :ldapname => “cn”) do

setcode do

#    hostname = nil

#    if name = Facter::Util::Resolution.exec(‘hostname’)

#      if name =~ /(.*?)\./

#        hostname = $1

#      else

#        hostname = name

#      end

#    end

#    hostname

hostname = Facter::Util::Resolution.exec(‘uname -n’)

end

end


I can’t take credit for the hosts one, i found this here : https://narvi.puppetlabs.com/attachments/1523/hostname.rb.patch

These files need to be modified on the nodes that happen to have a period in the hostname, and this post is so I don’t forget how I did it. 😛
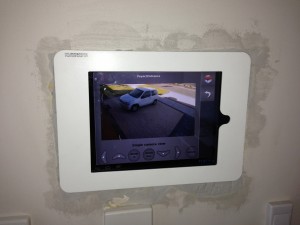
 

Wall mount tablet progress

So this may look super messy, well that’s because it is… However it is progress!

Tablet is finally mounted and charging off USB (Squeeeeee) The good thing about this particular mount is that my ipad and touchpad both fit.

Currently pictured is the touchpad running android CM10 and Linuxmce Orbiter.

IMG_6909

Keg TIG welding (Kettle)

Ok, I am just posting this quickly so I can link to these images on a forum I am currently posting too 😛
The TIG welds should of been purged with Argon, but we were lazy and as a result you can see what happens (I have tried to clean it up as best I can and I hope it doesn’t cause any issues with the brewing).

Random Blog Update….

Well it has been a while since I have posted anything on my blog.  Work has been super busy as has life in general.  I have made some progress to my home automation project and my homebrew project, although I haven’t actually done any home brewing for a very long time… But I will get into that later.  This post is just to let anyone who cares or has an interest in what I am doing that I am still alive and will make an attempt to finish off all the outstanding posts I have started previously.

  • The IP Camera stuff I intend to finish I just need to find a better way of doing it before I post anymore.
  • The Mango beer I created was shit and a real disappointment, I will have to try it again though.
  • Solarpanels are still working… YAY however due to my bill being so high (to much computer shit running) It doesn’t really make that much difference 🙁 I plan on increasing the capacity though…
  • Z-Wave stuff, well the whole house is now Z-Waved excluding the bathrooms.. But I will do them eventually!! 😛
  • Micro brew system (I will post some information about this later).
Well that about summarises most of the stuff I have been working on so far.

Mango Fandago Scene 1 Take 1

Last week I purchased 12 Mangos at 99c each and pushed these through the juicer. Unfortunately they didn’t produce that much juice, so I kept the pulp also. I am hoping it is going to be enough for my first mango beer attempt. No biggy if it isn’t as I have enough grain to take a another crack at it. Today I finally managed to brew my base brew as previously posted. Nothing out of the ordinary here, brew day went well and I opted to use a 18/45 blend from Proculter. Mad props go out to Wayne for hooking me up with some awesome blends! I also purchased a 73 for the next mango attempt.  This way I can see which yeast works better.  Any who after mash in and the boil (adding some SAAZ along the way for flavour and aroma) my OG was 1045.. Not too bad as the recipes Expected OG is 1047 and hell this is BIAB spec (No fancy rig for me yet!!!) 😛 I also decided to do a 2L yeast starter so I tonight I have just pitched that while my wort cools down, unfortunately I am not a fan of wasting water so I use the no-chill approach.  This method does run higher risks of infection in your beer but so far so good, besides I don’t have the money to buy a good Counter Flow Chiller.

I will add some pics to this post later!

Till then, enjoy and have a good night! 😛

Fist of the SUN!

On the 21st of March 2011 I got my Solar Panels and inverter installed! Thats to Shane from A Womans Spark for tolerating me so much.  If any one out there is interested in going solar give them a call or visit them at http://www.awomansspark.com.au/ and if you do opt to go with them I sent you (maybe I will get some kick backs!!!) 😛
Anyway, I spent the last week playing around with a perl script that was written to speak to the CMS 2000 inverter. http://www.solarfreaks.com/cms2000-inverter-rs232-serial-port-hack-cms-2000-rs232-t271-140.html mad props to the original author for doing all the hardwork and mad props to Shell_l_d too!
Below are a few pictures of my install, I have a Eaton EATN2000 (which is the same as a CMS2000) and 9 x 188W Solar Sunny ZDNY-C72 Panels. I plan to add 2 more panels onto this setup if I can find them cheap!

When I get some time I will post my dirty hacked scripts and some graphs too! Currently using the script mentioned above but hacked up to produce the rrd I want and Cacti.
Oh and 5 points goes to anyone who can guess where the title for this post came from! 😛

IP Camera Hardware List

Below is a list of components required to achieve a homegrown dual USB to IP camera. (Hope that made sense) 😛
For my setup I have the following Hardware;

1) Seagate Dockstar
2) CA-42 Nokia Cable
3) 2 x Logitech C910’s
4) Trendnet TPE-112GS
5) Old Outside CCTV Camera Domes
6) Relevant tools to dismantle the Dockstar and Cameras.

At home I use a POE switch so I try to power everything I can off this.  The Dockstar itself takes 12VDC so i tested the current draw of the unit with both cameras running and it came well under 1AMP, therefore when the 48VDC POE provides is step down to 12VDC I had plenty of current to play with.  Initially I tested with a 100mbit Step down adapter however I had duplexing issue with the network interface on the Dockstar and I couldn’t seem to change these settings.  I have since purchased a Gigabit version to use.  The CA-42 cable is utilised to get serial connectivity to the Dockstar, a really good guide on adding a serial header to the device can be found here : http://www.yourwarrantyisvoid.com/2010/07/21/seagate-dockstar-add-an-accessible-serial-port/ Highly recommended read.  As a result I wont go into this unless I get time 😛

Well that’s about it for the core hardware components of this project, if I have missed anything I will be sure to add it as I go with the guide.


Home made IP Camera Checklist

I thought I would start writing up a check-list for my IP Camera howto.
With the help from a friend of mine (Hewball) and various other people throughout forums and what not (Assisp) oh and various guides on how to install OpenWRT in a Seagate Dockstar specifically this guide : http://wiki.openwrt.org/toh/seagate/dockstar I have managed to be able to run 2 x Logitech C910’s off a Dockstart via a POE step down convertor.  This blog post is a check list of what things I need to cover in order to replicate doing it again.

1) Hardware List
2) Installing Openwrt on the Dockstar
3) Kernel Patches to apply to uvcvideo.h
4) Scripts to start cameras on boot/hotplug
5) Modifications to Cameras to suit outside conditions
6) Future additions

Well I hope that covers it all, the next post will cover all hardware that I used to get the particular set up I was after.


Mango Fandango Brew

I like Matso’s Mango Beer however I can’t drink a lot of it in one go as it is a little to sweet for that, but I do like it enough to try my hand at brewing my own.

Below is a base recipe to play with, as you can see I am going to put some SAAZ-B into this brew as I think this will work well with the Mango.  I plan to brew two different batches, one I will drop in the mango 10 mins before flame out.  This should allow enough time to kill any nasties in the mango however we run the risk of destroying some of the flavour so the second batch will have the mango pitched in the secondary.  I will either pasteurise the mango at 65 degs for 30 mins before pitching or just throw it in. I am hoping if I decide to just throw it in, there will be enough alcohol in the beer after the primary fermentation to kill any bacteria they may be introduced.  So I am undecided as to which path I should take….

Anyways below is the proposed basic recipe for my beer (minus mango and yeast).  I haven’t picked a yeast yet as I am waiting for my yeast guru at http://www.proculture.com.au/ to suggest one of his fantastic strains.

Base Brew for Experimenting

Selected Style and BJCP Guidelines

0- No Style Chosen

Minimum OG: 0.000 SG Maximum OG: 0.000 SG
Minimum FG: 0.000 SG Maximum FG: 0.000 SG
Minimum IBU: 0 IBU Maximum IBU: 0 IBU
Minimum Color: 0.0 SRM Maximum Color: 0.0 SRM
Recipe Overview
Wort Volume Before Boil: 33.00 l Wort Volume After Boil: 25.00 l
Volume Transferred: 24.00 l Water Added To Fermenter: 0.00 l
Volume At Pitching: 24.00 l Volume Of Finished Beer: 24.00 l
Expected Pre-Boil Gravity: 1.036 SG Expected OG: 1.047 SG
Expected FG: 1.010 SG Apparent Attenuation: 78.6 %
Expected ABV: 4.9 % Expected ABW: 3.9 %
Expected IBU (using Tinseth): 2.7 IBU Expected Color (using Morey): 4.9 SRM
BU:GU ratio: 0.06 Approx Color:
Mash Efficiency: 75.0 %
Boil Duration: 60.0 mins
Fermentation Temperature: 18 degC
Fermentables
Ingredient Amount % MCU When
German Pilsner Malt 4.500 kg 90.0 % 2.0 In Mash/Steeped
German CaraMunich I 0.250 kg 5.0 % 2.9 In Mash/Steeped
Belgian CaraPilsner Malt 0.250 kg 5.0 % 0.8 In Mash/Steeped
Hops
Variety Alpha Amount IBU Form When
NZ B Saaz 7.0 % 10 g 2.7 Loose Whole Hops 10 Min From End
NZ B Saaz 7.0 % 10 g 0.0 Loose Whole Hops In Fermenter
Other Ingredients
Ingredient Amount When
Yeast

No Yeast Chosen

Water Profile
Target Profile: No Water Profile Chosen
Mash pH: 5.2
pH Adjusted with: Unadjusted


Total Calcium (ppm): 0 Total Magnesium (ppm): 0
Total Sodium (ppm): 0 Total Sulfate (ppm): 0
Total Chloride(ppm): 0 Total Bicarbonate (ppm): 0
Mash Schedule
Mash Type: Full Mash
Schedule Name: Two Step Infusion (50-68C)


Step Type Temperature Duration
Rest at 50 degC 15
Raise by infusion to 68 degC 0
Rest at 68 degC 60
Recipe Notes

Unable to remove a Z-wave pairing??

Hey All,

It has been a long time since I have posted and a lot has happened, both with the Home Automation, Work and the Brewing…. Where do I begin???
I know, I shall begin with the Z-Wave Stuff. So far out of the 6 Z-wave in-wall devices I have purchased 2 have been faulty. They have since been replaced (mad props to www.smarthome.com.au). With one of the faulty Z-Wave devices I had I managed to add it to the controller, but could not control it, nor could I remove the pairing. This was a huge pain in the back side as there is no implementation in LinuxMCE to force remove a paired device from the USB Sticks Database.  So what happens in a situation like this? You have to remove and pair everything up again, that’s fine if you only have a few devices but not fine if you have 30+. 🙁  No problem I found a windows program posted on a forum (can’t remember where but most likely the Linuxmce Forum) that can permanently remove paired devices in the even they are faulty and can’t be unpaired gracefully..


That program is here.


Return top